5 Tips for Changing Job Schedulers
Before migrating from a legacy job scheduler to an automation solution like ActiveBatch, there are 5 key things every organization needs to know.

Once you’ve made the decision to upgrade from your legacy scheduler and you’ve identified a modern automation solution as a replacement, the next question is how to migrate to your new automation solution.
When approaching such a move, most organizations are concerned with the risk, cost, and time commitment the migration will incur. In order to ensure a successful migration, keep these 5 things in mind before you embark on the process:
1. Automated Migrations Reduce Complexity
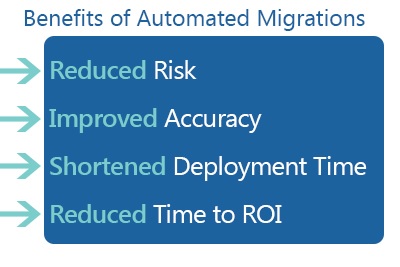
Many organizations think the burden of the migration falls squarely on their shoulders. However, oftentimes the solution provider for your new automation solution will have a set of automated migration tools and services that eliminate the need for a time-consuming manual move.
For organizations who want to minimize the risk of losing critical workflows/processes and the risk of manual errors, an automated migration to a new job scheduler provides a secure, proven method of moving from your old scheduler to your new automation software while keeping your existing data in-tact.
While the automated migration process will vary depending on your solution provider, typically, the transfer will be carried out via a command-line program that will output an .xml file, which will then be imported into the new automation solution.
2. Sometimes It’s Easier to Start From Scratch
After initially deciding on an automated migration, we’ve seen many organizations flip the paradigm on their automation strategy and start fresh by building out new workflows from scratch in their new IT automation solution. While this approach requires a lot of time and people resources to build out new processes and workflows, you get the benefit of building on a blank slate, without having any existing broken processes or workarounds that create complexity in the environment.
3. Know When Your Existing Scheduler’s Support Ends
A critical part of planning your migration is finding out when your existing scheduler’s support contract ends. This is important because you need to ensure you have access to your existing scheduler’s support services throughout the migration.
For example, if you just start your migration process in mid-July and your existing scheduler’s support contract ends August 1st, you may need to consider asking for an extension on your legacy scheduler’s support so that you don’t end up losing support before you’ve fully transitioned your existing workflows and objects into the new automation solution.
On the other hand, finding out when your support ends is also important from a cost savings perspective. Generally when you purchase scheduling/automation software, support contracts are offered on an annual basis. Therefore, when planning your migration you want to have some overlap in support from your existing scheduler and your new automation solution, but only to the point where you have finished your migration so that you’re not paying double support fees for the entire year when you only need both support services for 3 months.
4. Protect Your Automated Migration
Before you agree to an automated migration with a solution provider, the solution provider should work with you to develop a clear statement of work that fully outlines your responsibilities during the migration process and the provider’s responsibilities.
Statement of works are flexible and most solution providers will take on more or less responsibility depending on what the customer desires. For example, statement of works can include services such as Installation, Custom Development, Best Practices, Knowledge Transfer, and more.
Additionally, automated migrations are often under warranty for a certain amount of time to ensure all objects are successfully migrated over. You should look for this in a statement of work and plan accordingly if it is not included.
5. Attend Training During the Migration
Depending on the total number of jobs and workflows, the entire process from the start of the migration to production can take weeks to several months. Attending training courses while the solution provider is performing the automated migration or while other team members are working on a manual migration can help minimize the learning curve. This way, when the migration is finished, you have a better understanding of the new automation solution and can immediately start using new capabilities and features to improve your IT environment.
For a more in-depth look at how to approach your migration, check out our Migration Checklist, which offers a Step by Step Guide to planning your migration.